Depending on the properties of each individual button, several methods can be used to change settings.
|
• |
Select the left side of the button to decrease the numerical value. Select the right side of the button to increase the numerical value. |
|
• |
Press and hold the left mouse button. Move the cursor right to increase the value. Move the cursor left to decrease the value. |
|
• |
Spin the scroll wheel in either direction to increase or decrease the numerical value. |
|
• |
Type the required setting using a computer keyboard (if you have one connected to your EK80 system). |
|
• |
Select the button to open the button menu. Choose the required setting. |
|
• |
Select the button to open the dialog box. |
Choosing a setting with the [+] and [–] buttons
|
1 |
To change the setting, move the cursor to either side of the button. |
|
2 |
Observe that the background colour changes.
|
a |
Select the left side of the button to decrease the numerical value. |
|
b |
Select the right side of the button to increase the numerical value. |
|
Choosing a setting by moving the cursor horizontally
|
1 |
Place the cursor on the button. |
|
2 |
Press and hold the left mouse button. |
|
3 |
Move the cursor horizontally over the button.
|
a |
Move the cursor right to increase the value. |
|
b |
Move the cursor left to decrease the value. |
|
|
4 |
Release the mouse button when requested value is shown. |
Choosing a numerical setting with the scroll wheel
|
1 |
Place the cursor on the button. |
|
2 |
Spin the scroll wheel in either direction to increase or decrease the numerical value. |
|
3 |
Release the scroll wheel when the requested value is shown. |
Choosing a setting with the keyboard
|
1 |
Place the cursor on the button. |
|
2 |
Select the button to open the text field. |
|
3 |
Type a numerical value. If the value exceeds the permitted range, the frame turns red. Type a new value within the accepted range.
|
|
4 |
Press Enter on the keyboard. |
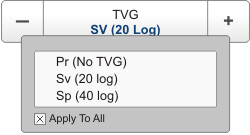
Choosing a setting on the button menu
|
1 |
Place the cursor on the button. |
|
2 |
Select the button to open the button menu. |
|
3 |
Choose the required setting., The chosen setting is applied, and the menu closes automatically.
TipSeveral of the functions offer Apply to All. If you select Apply to All your setting is applied to all the views simultaneously.
|
|
4 |
Whenever applicable, you can make a selection by selecting the left or right side of the button. This method does not show you the menu choices.
|
a |
Select the left side of the button to select a "lower"' menu choice. |
|
b |
Select the right side of the button to select a "higher"' menu choice. |
|
Selecting settings using a dialog box
Select the button to open the dialog box.
Once you have made the necessary settings, most dialog boxes provide the following options:
|
• |
Select OK to save the selected settings and close the dialog box. |
|
• |
Select Apply to save your settings without closing the dialog box. |
|
• |
Select Cancel to close the dialog box without making any changes. |