Pelagic echogram description
The Pelagic echogram shows you a selected part of the water column. The echoes start from any start depth below the sea surface, which is used as depth reference. The bottom contour shall not be visible in the echogram. You can select the start range (the depth from which the echogram starts) and the vertical range (the vertical "length" of
the echogram) by means of the Start Range and Range settings. Both the Range and the Start Range functions are located on the Main menu.
How to open

To activate Pelagic echogram, click in the chosen view to make it "active". Select Echogram on the Active menu. Select the Echogram tab to open the page. On the Echogram page, set Echogram type to Pelagic.
Description
A Pelagic echogram is mainly used when you wish to look at the water column starting from any distance below the sea surface down towards
the bottom, but without seeing the bottom contour. To do this you must set up the Start Range to the preferred upper depth. The Range depth must then be chosen to make the echogram stop somewhere over the bottom contour. This gives you good opportunity to study the echoes from the water column.
Pelagic echograms are useful when you work in deeper waters. The reduced range and the fact that you do not need to wait for the bottom echo means that the ping rate is increased. The software algorithms in the EK80 system are designed to work without the bottom detection reference.
In a Pelagic echogram the calculations disregard any bottom detection. All calculations are based on the entire echogram shown in the view. If the bottom echo is present in the echogram, the biomass calculation will be wrong.
Tip

For closer investigation, use the Zoom information pane to enlarge echoes from the water column.
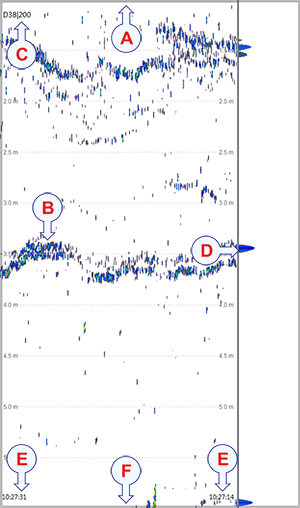
| A | This is the start depth of the echogram In a Pelagic echogram you may wish to start the echogram from a certain distance below the surface, and will then set the Start Range to a relatively large numerical value.
|
| B | Echoes These are echoes from fish or other objects in the water column.
|
| C | Transducer identification This text identifies the transducer - and thus also the channel - used to create the echogram. In this context, the term channel is used as a common term to identify the combination of transceiver, transducer and operating frequency.
|
| D | This is the scope view The Scope view is used to indicate how strong each echo is. The colour and the length of each line reflects the received echo amplitude.
|
| E | These are the labels Small labels are shown in the bottom left and right corners of the view. These labels can contain time or distance to identify the horizontal axis of the echogram. You can hide the labels from view.
The labels can be changed on the Horizontal Axis page in the Echogram dialog box.
|
| F | This is the lower end of the chosen depth range The Range value defines the vertical "height" of the echogram. In order to hide the bottom contour, this numerical value must be chosen
with care. Subtract the start range value from the actual depth. This gives you the maximum range value.
|
Example
Start Range in a pelagic echogram
In a pelagic echogram, set the Start Range value to 20 meters. This will make the echogram start from 20 meters below the sea surface (provided that the transducer
offset has been defined). Set Range to 40 meters. The echogram will now show the area from 20 meters below the sea surface, and down to 60 meters below the transducer.
Provided that the depth is larger than 60 meters, the bottom contour is not shown.