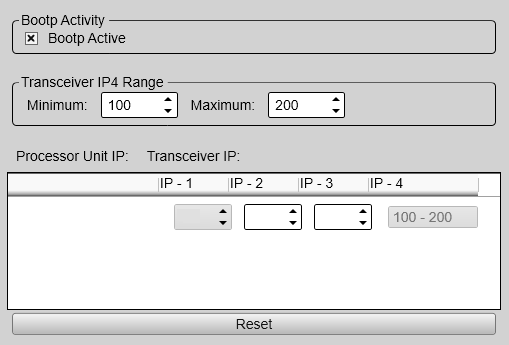
Transceiver IP Address page
The Transceiver Installation parameters control the installation and disconnection of transceivers. If you have several transceivers in a large EK80 system, it may be useful to control the IP Addresses used to communicate with each transceiver. These IP Addresses are defined by a BOOTP server in the computer, and assigned to each transceiver.
Description
In order to establish communication between the computer and the transceiver(s), each transceiver must have unique Internet
Protocol (IP) Address. The software in the computer includes a function ("Bootp server") that automatically defines and assigns one IP address to
each transceiver.
Tip
The IP address of the computer can either be fixed, or automatically obtained from a network.
| 1 | In the bottom-left corner of your desktop, select the Windows® search function. |
| 2 | In the search box, type "Network Connections", and open the Network Connections dialog box. |
| 3 | Right-click the network adapter you are going to use and select Properties on the shortcut menu. |
| 4 | On the list of connections, select Internet Protocol 4 (TCP/IPv4), and then Properties. |
| 5 | Obtain an IP address automatically, or specify a specific address for the Ethernet adapter. |
If you wish to connect the computer to the ship’s network, you need two Ethernet adapters.
| • | Set up one adapter to communicate with the transceiver. Specify a dedicated IP address. |
| • | Set up one adapter to communicate with the ship’s local area network (LAN). Obtain the IP address automatically. |
All the transceivers in the WBT family obtain their IP address from the EK80 system. If you have changed the network settings, turn each transceiver off and on. The EK80 system automatically assigns an IP address to each transceiver when they are turned off and on.
The IP Address assigned to each transceiver will automatically use the same address range as the address given to the computer.
If you are an advanced user, you can use the parameters provided to control these addresses.
Example
If you have set up your computer IP Address to 157.237.52.100, the IP Address(es) to the transceiver(s) will always start
with 157.237. The IP3 and IP4 elements are chosen automatically within the ranges defined. If you have three transceivers, they may be provided with IP
Addresses 157.237.52.101, 157.237.52.102 and 157.237.52.103.
This functionality is provided for advanced users. We assume that you are familiar with Ethernet communication and the relevant
parameters.
Note
When you work in the Installation dialog box, you must always select Apply to save the changes made on a page. You must do this before you continue working on a different page.

Details
Bootp Activity
The Wide Band Transceiver (WBT) is not provided with a fixed IP Address for Ethernet communication. This happens automatically when the transceiver is connected, since the computer software includes a Bootp configuration server. If you have several transceivers connected to your computer, each transceiver will automatically be assigned a unique IP Address.
Note
This automatic assignment of an IP Address to the transceiver will only work when Bootp Active is enabled.
Transceiver IP4 Range
On large networks, you may wish to limit the range of the IP Address(es) provided to the individual transceiver(s). The Transceiver IP4 Range parameters allows you to define upper and lower limits for the fourth element in the IP Address(es). When you make a selection using the spin boxes, observe that the chosen limits are shown in IP4 column in the table.
Note
This functionality is provided for advanced users. We assume that you are familiar with Ethernet communication and the relevant
parameters.
IP Address table
Use this table to define the IP address(es) provided to the transceiver(s).
| • | IP-1 and IP-2 are provided by the computer, and reflects the choices you made when you set up the Ethernet adapter. |
| • | IP-3 is chosen using the box. |
| • | The IP-4 range is selected using the Transceiver IP4 Range boxes. |
Note
This functionality is provided for advanced users. We assume that you are familiar with Ethernet communication and the relevant
parameters.