Record RAW function
A key function of the EK80 system is it ability to record echo data. Record RAW allows you to record the unprocessed echo data received by the transducer. You can save the data to the hard disk, or onto an external storage device. The data files can be played back on the EK80 system. You can keep the recorded files for scientific studies, future references or for training purposes.

How to open
This function is opened from the Operation menu.
Description
The raw data recording function provided by the EK80 system allows you to save echo data using the *.raw format. By means of the Replay function you can later play back the recorded file(s). This may prove useful if more a detailed study of the data is requested. You can also use the file(s) to experiment with the operational settings, as this will help you to gain more experience. The amount of data you can record is only limited by the size of your storage media.
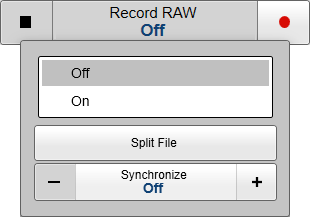
The Record RAW button allows you to start and stop recording, split the current recording file (if it gets too large), and set up the file
output parameters. Once all the recording parameters have been defined, you can start recording by clicking the red circle on the button, and
stop it by clicking the left rectangle.
Tip
The Output dialog box on the Operation menu allows you to set up the recording parameters. To define which disks and folders to use to save the data files, select File Setup.
Raw files will be split automatically due to certain criteria.
Changes in sensor readings will be recorded in the raw files according to information from the sensors. These types of RAW file splits are done in order to assure that the environment datagram and pulse/filter
information found in the start of all raw files are valid throughout the entire file.
| • | Backscatter (Sv) falls below 5 m/s. |
| • | Temperature rises above 1°C. |
| • | Changes in transceiver installation or transceiver settings which require the filter and/or pulse files to be updated. |
You can record both RAW and processed data using the Record RAW and Record Processed functions. It may be useful to synchronize these two functions to automatically record all data formats simultaneously. To synchronize the recording functions, open the Record RAW button, and set Synchronize to On. The Record Processed button is then inhibited, and you can start and stop all recording by means of the Record RAW button.
To change the file and folder parameters, open the Output dialog box on the Operation menu, and select File Setup.
You can save and recall echo information using the following methods and formats:
| • | Bitmap images (containing the full screen) are saved when you select Screen Capture on the top bar. Each screen capture you make is saved in .jpg format on the Processor Unit hard disk. The Screen Captures tab on the bottom bar opens a dedicated viewer that allows you to open these images. In the viewer you can also open the file folder on the hard disk. You can copy, rename or delete the image files. |
| • | Use Record RAW on the Operation menu to record raw data. To play back data, select Operation and then Replay mode. This mode allows you to play back previously recorded data. In Replay mode the EK80 system is not able to transmit ("ping"). For this reason, the EK80 system is inactive during playback. |
| • | A "history file" is recorded automatically and continuously. When the file is full it will start to overwrite the oldest data, thus creating a "ring buffer". These images can be recalled using the History information pane. The information in the History presentation is the same as on the original echogram presentation. To open the History information pane, select the button on the top bar. |
| • | Use Record Processed on the Operation menu to record processed data. This is only an export format. Processed data files can not be played back on the EK80 system. |
Note
The data files will normally become very large. If you wish to record large amounts of data, make sure that you have enough space on your hard disk. Unless your computer is equipped with a very large disk, we recommend that you save the data to an external storage device.
Ways to start and stop recording

You can start and stop data recording in several ways.
| a | On the Operation menu, select the red circle in the Record button to start recording. Select the black rectangle to stop recording. |
| b | Select the middle of the Record button to open it, and select On or Off. |
The Record indicator on the top bar will switch to red colour when recording is active.
Details
On/Off
You can use the Record RAW button menu to start and stop recording. Click the middle of the button to open it, and select On or Off. For faster control, use the right and left side of the Record RAW button. To start recording, click the red circle on the right side. To stop recording, click the black rectangle on the left
side.
Note
Set up the recording parameters before you start the recording. The File Setup settings control how and where the recorded files are saved on the hard disk, or on an external storage device. The File Setup page is located in the Output dialog box.
Split File
During recording, you can click this command at regular intervals. Every time you do so, the current recording file will be
terminated, and a new file will be started. In this way you can manually control the size of each recorded file.
Synchronize
You can record both RAW and processed data using the Record RAW and Record Processed functions. It may be useful to synchronize these two functions to automatically record all data formats simultaneously. To synchronize the recording functions, select Synchronize and set it to On. The Record Processed button is then inhibited, and you can start and stop all recording by means of the Record RAW button.